Sunday 17 July 2022

Fibreglass Panels | Final Application

Some parts of the hull still required more fibreglass patches, so that was next.

When I 'glassed the cockpit I overlapped panels from the seatbacks and the cockpit deck, but unfortunately when smoothing the deck I sanded away the overlap which did not seem to have adhered securely to the other panel.

The same thing happened on both sides of the cockpit, so I ended up with a butt joint on the 'glass panels instead of a much stronger overlap.

So this need to be remedied. Here are the reinforcing strips laid in place, with the port strip wetted out.


The transom skirt still needed to be 'glassed, since I did not do that when the boat was upside down.

Here is the dry skirt panel laid in place.


And lastly here are the wetted out panels on the skirt and cockpit deck.


I will fill the weave and blend in the panels when fully cured.


Cabin Roof | Masking For Paint

When the companionway hood was test fitted to my satisfaction I pencilled in the section of the cabin roof which will be painted before the hood is permanently installed. It is easier to do the painting now.

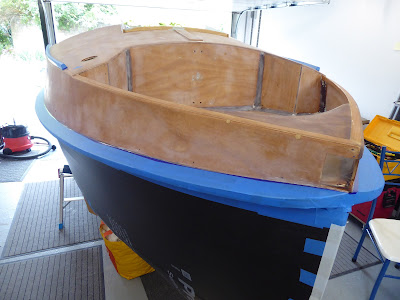
So the hood was removed and the roof was suitably taped up, like this.


Paint next!

Companionway Hood | Test Fit

The companionway hood needs to be installed before the topsides can be painted, so that was the next task.

I made the hood and slide at the beginning of last year and set them aside until now. I carried out a test fit at the time but thought it best to do it again before getting out paint and epoxy.

Here is a test fit of the hood and slide together, held in place with a couple of sliding clamps.


I was not too surprised to find that the holes in the cabin roof for temporary screws no longer lined up exactly with the pilot holes in the hood frame.

Maybe the hood has moved slightly while in storage. We will never know!

So I simply blocked the original holes in the frame and marked up new ones before drilling them.

Here are the tools for marking and aligning the new holes.


The green marking tool ('MarxMan') shoots a jet of green chalk through the screw holes in the cabin roof, showing us exactly where to drill the pilot holes.

The bradawl is handy for aligning the frame before fastening it in place with temporary screws.

Here is the refitted hood.


And here is view of the hood interior.


The cabin roof and the inside faces of the hood will be painted before final installation.

Paint is the next activity!


Rub Rails | Rounding Over & Masking Off

With the paintwork below the rub rails protected from scrapes and the mess created by wet sanding it was time to mask off the rails themselves.

I scraped away excess varnish which had dribbled down onto the upper surface when the boat was upside down, and sanded the rails smooth with a P80 grit.

Then I rounded over the upper edge to match the lower one, using a Shinto rasp before finishing with some P150 sandpaper. The ship's cat paid a visit to check on progress, as in this pic.


Finally I masked off the rails using 3M profiling tape on the seam where the rail is joined to the hull, and blue tape to cover the rest of the rail, as here.


You can see in the above pic that I have treated the toe rails on the cabin roof in the same way.

It's good to have the boat right way up again! 

Thursday 7 July 2022

Keel Support | Making A New Block

The boat seemed to be seated securely in its cradle, but the stern needed support to prevent it from moving when I am working in the rear part of the cockpit.

I made a support block to do this at the start of the build, and I simply made a new one for the latter part of the process.

Here it is in place, suitably padded to protect the paint.


Paintwork | Protective Measures

With the boat right side up once more, I was keen to start work on finishing the topsides.

However, there was one significant issue to resolve urgently - a vast expanse of lovely paintwork at risk of being damaged. Unintentionally, of course. But there was no doubt that it would happen. None whatsoever.

So I wrapped the paintwork in protective sheeting.

First a soft waterproof membrane next to the hull, like this.


Then a tough, hard layer of protective floor covering over that. This is the transom.


And this is the view from the starboard side.


That should lessen the chances of scratches and dings!


Flipping The Boat | Over She Goes Again!

The date for flipping PocketShip upright was set for Friday 1st July, at 7pm.

Some of the original flip team members were re-recruited, and some new ones persuaded to join.

I put six sheets of Sterling board down on the gravel drive again, to provide a flat surface for feet and wheels.

We raided the house for carpeting, and laid that down to provide a soft surface for the boat's paintwork.

The wheels were fitted to the build cradle, and beer and wine was put to chill.

The day and the time arrived, and the crew assembled.

I briefed the team on what we were going to do, confident that based on experience from last August the task was really quite straightforward.

And so it proved. Here we are carrying the boat out of the garage - sorry, workshop.


Four or five people on each side can lift it easily.

Next the boat was turned over. Like this.


And then it was carefully set down on its keel.


The now redundant dollies were removed and the strengthened build cradle was pushed into place, and the boat was carried in and installed back in its cradle.


The relieved builder enjoyed a glass of something cold...


As last time MVLW (my very lovely wife) cooked up a delicious supper, and Nicky kindly provided delicious salads. Thanks ladies!

It was a very happy and satisfying evening.

The next day I checked that all was well, and it was.

Here is the boat, finally upright and resplendent.


Massive thanks to Andy and Rain, Rod, Pete, Nick, Duncan, Kevin and Alison, Pete and Nicky, MVLW, and Moth and Jane.

Now all I have to do is finish painting her, and fit her out!


Centreboard | Making Secure

I was thinking through the process for turning the boat right side up and realised that the centreboard would drop down if not held in place in its trunk.

That would be highly inconvenient, not to mention dangerous!

I toyed with a cargo strap passed around the hull but that was clearly not going to work.

So I simply dry fitted the centreboard pendant bushing, pulled the pendant tight and put a big, fat knot in it.

Like this.


Crude but effective. That will do the job.


Build Cradle | Reassembly

The original build cradle would be required to finish the build when we flipped the boat upright.

The front and rear ends of the cradle were originally held apart by a pair of flimsy strips of MDF which promptly snapped when I made a trial attempt at moving the boat outside on its own wheels.

So it would need substantial reinforcement if it was to be reused. It would also need to be padded to protect that precious paintwork.

I widened the slot for the keel so that there was plenty of room for it, and rounded over any rough edges and corners.

A pair of strong 4"x2" beams were installed to hold the cradle ends apart, and their support brackets doubled up for strength.

Finally a nylon exercise mat was cut up to provide padding for the cradle and stapled into place.

Here is the reassembled cradle.


The wheels will go back on nearer the day.

I also wanted to be sure that we dropped the boat into the right place on the cradle, so I made cradle end templates out of hardboard and held them the correct distance apart with one of the cradle beams.

I positioned this on the hull and marked the location of the inside face of each end with bits of tape.

This is what it looked like.


That will guide us on where to position the cradle on the big day.


Transom, Side & Bottom Panels - Final Polish!

A date had been set for turning the boat right side up once more, and I wanted to make sure she was looking her best for the big occasion.

One final polish was required. I used T-Cut, which is frequently used to brighten car paintwork. This is it.


I lightly wetted the hull paintwork and and gave it a gentle polish with T-Cut on a damp cloth before buffing with a soft cloth, a couple of square feet at a time.

It shined up nicely. Here are the transom and bottom panels.


And here is the port side.


All ready for the big day!


Dorade Boxes | Finishing The Interiors

I had been meaning to touch up inside the Dorade boxes when I had some spare time. The cleats and the roof needed to be tidied up and painted while the hull was still upside down, and it would soon be upright again.

It didn't take long. Sanding the seams, some primer and a couple of coats of gloss finished off the interiors.

Here is the port box.


Nearly ready to flip the boat again!


Mast, Spars & Other Bits | Re-varnishing (2)

The mast, bowsprit and boom gallows eventually received seven coats of varnish and were stored away to provide room for the rest of the spars and components to be varnished.

The tiller and drop board retainers had been sanded back to bare wood following their initial and unsuccessful varnishing. They then got eight coats applied by roller and tipped out with a foam brush. They turned out nice.

The boom and gaff were lightly sanded to provide a decent surface, again following an unsuccessful first attempt at varnishing. Four coats of varnish followed. Roller and foam brush again worked well.

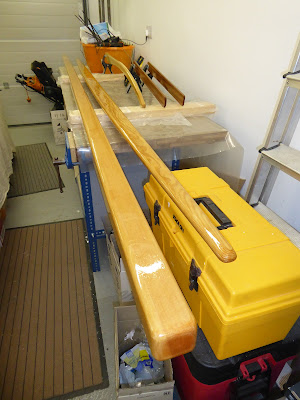
Here are all the parts after the final coat of varnish.


I was able varnish all sides of the tiller and drop board retainers at once by holding them upright with spring clamps.

Once the varnish had hardened I moved everything into the house, out of harm's way.


Drop Boards | Sanding & Priming

The drop boards were the very first thing that I primed and painted, simply to get some practice before tackling the hull.

At the time I thought they turned out quite well, but after working on the hull for months to achieve a good finish I realised that the drop boards were really pretty poor in comparison.

In between other projects I sanded the boards back to bare wood. Here is one board half sanded.


And here the boards have received a first coat of primer on one side.


Other projects then took priority and the boards were set aside until later.


Companionway & Tabernacle | More Primer & First Gloss

I had previously applied three coats of primer to the outside faces of the companionway hood and slide, and the tabernacle. Now it was time to prime the insides.

Here is the slide with three coats applied.


And here are the hood and tabernacle.


It would soon be time to turn the boat right side up, which will mean that one of the first tasks will be installation of the companionway hood.

I decided that it would be easier to paint the inside of the hood beforehand, as I had done with other parts of the boat. Hood and slide were accordingly sanded to a P120 finish, ready for gloss.

Here is the hood after the first coat of gloss was applied to its inside faces.


It will get several more coats and will be wet sanded to a good finish before installation.

At the same time I applied a coat of gloss to the exterior of the slide. As here.


The inside faces of the slide will be painted to match the cabin interior at the very end of the build.

Looking good!