Tuesday 13 June 2023

Rudder | Test Fit

I left the rudder pivot eyes to cure for a while and then had a quick test fit of the rudder and tiller.

Here it is seen from starboard.


I was a bit dismayed to find that the slot for the tiller is slightly too low in the transom, as you can see here.


And here.


It works just fine but it looks like some cosmetic surgery will be required at some point.

I also think it could be a little wider to accommodate tiller movement.

I doubt very much that this will be the only modification!


Rudder | Installing Pivot Eyes (2)

I sat the rudder against the transom, at its correct height, and marked up the location of the two pivot eyes.

Here I am drilling the hole for the lower eye. I used a pencil line to guide drilling at the correct angle, as I did on the keel.


As with the keel eye I again used 3M 5200 adhesive sealant to secure and seal the eyes. This is the lower eye.


And this is the upper eye.


Very smart!


Hull Hardware | Marking Up

The time came to begin installation of the hull hardware.

Still smarting from the consequences of cutting the ventilator holes in the wrong place, I was resolute that I would plan this process very carefully and mark the exact location of everything before drilling any holes.

Working from the rear to the front of the boat, this is what I did.

At the stern the stanchion supports for the gallows boom poles are already loosely in place. I marked the location of the rear mooring cleats in front of the poles, and the hole for the mainsheet bridle in front of that. Like this.


I won't drill the hole for the bridle until the boat is rigged and I can see where it should ideally be.

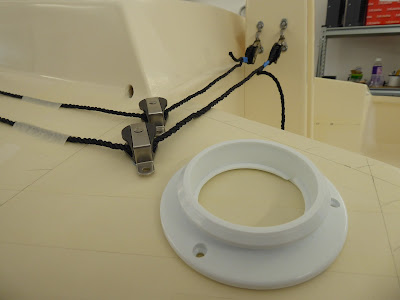
The location of the hardware on the cabin roof and tabernacle had to be exact so I fixed the components in place with Blu Tack until I got it just right.

Here are the halyard cleats at the rear of the cabin roof.


And here are the halyard cheek and lead blocks at the front of the roof and on the tabernacle.


I used a piece of old line to make sure everything lined up properly and located the ventilator in place at the same time.

The position of the jib sheet cam cleat is measured from the stem, so I made a measuring stick for this purpose. Here it is in use.


And here is the marked-up location for the starboard cam cleat.


Then I marked up the tabernacle, like this.


Then came the cabin roof, as here.


And at the rear of the roof the halyard cleats were marked up.


It will not be possible to know the exact position of the spinnaker sheet cam cleat until the boat is rigged, but I did know from conversations with other builders that that it would be between two points, so I marked them in. Like this.


The location of the mainsheet ratchet block and the centreboard pendant cleat were easy to determine. Here they are.


Fastening them in place will be a different matter. They come with machine screws and nuts for through hull installation, but they are both seated on the centreboard case so will require screws. I am wondering if that will be sufficiently strong for the ratchet block.

The location of the chainplates cannot be determined until the mast is up and the shrouds rigged, but it is again made by measuring from the stem. Here is the measuring stick.


The chain plates will be somewhere on this line, raked slightly backwards.


That's it for now. It will soon be time to drill holes ...


Cabin Interior | Refresh

The interior of the cabin and the storage compartment had become a bit tatty and discoloured over the course of the build and I decided some time ago that I would repaint it at an appropriate moment.

The moment seemed to arrive when I started to plan hardware installation, so I purchased fresh paint and cleaned up inside the boat.

I masked off the portholes to prevent paint running down the topsides. Like this.


The paint I am using inside the boat is top quality, oil-based household paint. It is suitable for exterior use and I think it's a better choice than marine paint for the interior.

It is an eggshell finish (semi matt) so easy on the eye, and it's brilliant white so it contrasts nicely with the ivory white of the topsides.

Two coats were applied with a short-felt roller. This is the finished cabin looking aft.


And here it is looking forward.


That's better!


Dorade Boxes | Finishing The Filler Pieces

I explained in a previous post how I cut the holes for the ventilators in the wrong place in the Dorade boxes, describing it as a 'cock up'. It certainly was, and it took a long time to rectify.

The last time I posted about this I had just applied the first coat of gloss to the tops of the boxes. Ten coats were applied in all, brushed on and tipped out with a foam brush.

When the paint had hardened I wet sanded it with P800 grit to get a smooth, flat surface. This is what it looked like.


And this is what it looked like with the tape removed and the edges feathered out with P400 and P800 grits.


And finally this is what it looked like after being wet sanded from P1200 through to P2500 and finished off with P5000 and P9000 polishing compound.


It looks OK in the photo but I can see the flaws on both boxes, and it is bugging the hell out of me.

I'm hoping that it will be less discernible when the hardware is fitted, and also that I can polish up the surrounding deck and roof to a similar shine.

We will see ... I've had much worse things go wrong with PocketShip but this one has really annoyed me!

Hatches | Test Fit

While I had the drill in action for the rudder pivot eyes I cleaned out the screw holes for the cockpit deck hatches which were all clogged with paint.

A quick test fit followed.


If only everything was so quick and easy ...


Rudder | Installing Pivot Eyes (1)

I needed to install 12mm pivot eyes on the hull and the rudder, to hold the pivot rod.

The build manual tells us to screw the eyes into the solid timber of the rudder and the keel, using un-thickened epoxy resin to glue them in place. The hole needs to be slightly smaller than the diameter of the eye's machine screw to allow a thread to be cut in the wood.

I drilled some holes in a piece of scrap Ash to check how much smaller the hole needs to be, and test fitted an eye. Like this.


The 6mm machine screw thread needs a 5.5mm hole to screw into.

The first thing I did was to mark up and drill a 6mm hole in the transom, for the upper eye on the hull. This is it.

A quick test fit followed. It looked OK.


Unlike the other three eyes this one is a through hull fitting, secured with a dome nut inside the transom. So it has to be exactly the right length.

Here I am measuring how much of the machine screw I need to cut off.


My next task was to drill a 5.5mm hole in the bottom of the keel for the lower eye.

I marked it up, picked up the drill and made a hole. I immediately realised that it was still fitted with the 6mm bit.

So, I plugged the hole and started again.

This time I drilled the 5.5mm hole at the wrong angle, so the eye would not fit correctly.

So again, I plugged the hole with some dowel and epoxy resin. Here it is.


Third time lucky? To minimise the amount of luck required I marked up the required angle on the keel, like this.


This helped enormously and I was able to drill a perfect hole.

Now, the manual says to use epoxy resin to secure the eyes but I had a lot of 3M 5200 adhesive sealant left over from the bow eye installation.

This stuff is supposed to be a permanent as well as waterproof bond, and I thought that would be better. So I used it instead.

It worked really well. The sealant acted as a lubricant when screwing in the eye, and it was an easy job.

Here I am installing the eye.


And here is the finished article.


That looks OK.

Finally, a quick test for the pivot rod. Here it is.


We are definitely getting there!


Rudder | Making The Pivot Rod

I noted in a previous post that the stainless steel rod provided in the kit for the rudder pivot was the wrong diameter (at 10mm) and the wrong length (too short). It should be 12mm in diameter and 33" long.

I contacted Fyne Boats and they sent a replacement, but I decided to practise drilling holes for the cotter ring keepers in the 10mm rod, which was now scrap.

I wanted to find out the correct size hole for the keepers, and also how hard it would be to drill stainless steel.

This is me trying, with a standard 4mm HSS drill bit.


It did not go well. The HSS bit made hardly any impression on the rod, although well lubricated with oil.

Some research soon revealed that we actually need a much superior type of bit to drill stainless, such as cobalt.

I duly purchased a set of Guhring cobalt bits. This is them.


I was assured by the vendor that they are "the bee's knees" of drill bits, and so they should be at the price!

I also invested in some proper lubricating fluid. This is it.


I was now equipped to tackle the stainless rod and started by practising on the scrap 10mm rod. I drilled two holes at 3mm and 4mm.

The cobalt bits cut effortlessly, and the cutting fluid kept it cool and easy to drill.

This is one of the keepers in the 4mm hole. The 3mm hole is too small.


Armed with this knowledge I set up to drill the 12mm stock, like this.


I had received a 1 metre length of rod which was heavy, so I supported one end on a block of wood.

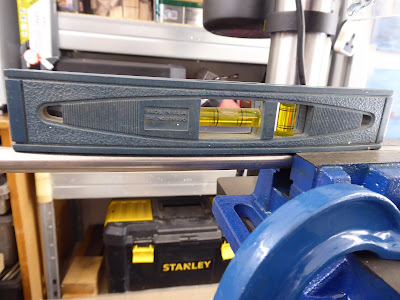
I also made sure it was correctly aligned by using a level, as here.


This is the first hole being drilled.


An old toothbrush is useful for clearing the swarf from the hole. I found that applying a continual flow of cutting fluid to the workpiece made for very effective drilling.

Here is one of the keepers in place on the new rod.


That looks good.

Here is the second hole being drilled.


The blue tape marks the required length for the finished rod, at 33".

So in the end it all went well!


Tabernacle | Making Pivot Bolts

While I was repainting the tops of the Dorade boxes I decided to make the mast and bowsprit pivot bolts for the tabernacle, while waiting for the multiple coats of paint to dry.

The kit provides a length of threaded 10mm stainless steel rod for this purpose. The first task was to cut two bolts to the correct length, like this.


Dome nuts are provided for these pivots, so the bolts have to be exactly the right length.

This is what the finished article looked like.


This is the pivot bolt for the mast, fitted in the tabernacle.


I secured the bowsprit in place with the lower bolt. This is what it looked like, viewed from outside the workshop.


She is looking quite jaunty!